.NET Core前后端分离(5) - IOC(控制反转)与DI(依赖注入)
准备好了所有的层,那么要如何办到在各个Service层中直接调用IRepository层,并控制调用的仓储层实例的生命周期呢,之前写在各构造函数中的参数是如何获得的呢,让我们来了解IoC(Inversion of Control)以及DI(Dependence Injection)这两个概念
IoC(控制反转)思想
控制反转(Inversion of Control,缩写为IoC),是面向对象编程中的一种设计原则,可以用来减低计算机代码之间的耦合度。其中最常见的方式叫做依赖注入(Dependency Injection,简称DI),还有一种方式叫“依赖查找”(Dependency Lookup)。通过控制反转,对象在被创建的时候,由一个调控系统内所有对象的外界实体,将其所依赖的对象的引用传递(注入)给它。
为什么需要控制反转
先从工厂模式开始
我们这里来写一段代码,定义一个小猫接口类,用几种不同的小猫类来实现这个接口,并且在调用程序用,动态的根据一个字符串的值,决定要用定义哪个小猫类,并且调用其发出叫声的函数
首先定义小猫接口ICat,其包含一个猫叫函数:
1
2
3
4
public interface ICat
{
    void Meow();
}
接着定义Cats类,里面包含三种不同类型的猫,并且都实现了ICat接口:
1
2
3
4
5
6
7
8
9
10
11
12
13
14
15
16
17
18
19
20
21
22
23
24
25
26
27
28
using System;

public class Cats
{
    public class BlackCat : ICat
    {
        public void Meow()
        {
            Console.WriteLine($"I'm {nameof(BlackCat)}");
        }
    }

    public class WhiteCat : ICat
    {
        public void Meow()
        {
            Console.WriteLine($"I'm {nameof(WhiteCat)}");
        }
    }

    public class PinkCat : ICat
    {
        public void Meow()
        {
            Console.WriteLine($"I'm {nameof(PinkCat)}");
        }
    }
}
最后,我们对其进行调用,调用的代码是这样写的
1
2
3
4
5
6
7
8
9
10
11
12
13
14
15
16
17
class Program
{
    static void Main(string[] args)
    {
        var strCatName = "BlackCat";

        ICat cat = strCatName switch
        {
            "BlackCat" => new Cats.BlackCat(),
            "WhiteCat" => new Cats.WhiteCat(),
            "PinkCat" => new Cats.PinkCat(),
            _ => null
        };

        cat.Meow();
    }
}
可以看到,此时采用的是在调用的地方来对具体对象进行初始化,这样做的缺点是什么呢,显而易见,这里的代码不符合对修改关闭的设计原则,虽然使用了接口,但是还是在实现业务功能的代码中初始化了好几种具体的类,如果需要增加或删除任何猫咪的种类,将不得不对这一段代码做出调整,并且如果其它地方需要使用的话,不具有可复用性
所以,我们创建一个新的类,将这个根据字符串获取具体类的方法放进去
1
2
3
4
5
6
7
8
9
10
11
12
13
14
15
public static class CatFactory
{
    public static ICat CreateCat(string strCatName)
    {
        ICat cat = strCatName switch
        {
            "BlackCat" => new Cats.BlackCat(),
            "WhiteCat" => new Cats.WhiteCat(),
            "PinkCat" => new Cats.PinkCat(),
            _ => null
        };

        return cat;
    }
}
之后,再对其进行调用
1
2
3
4
5
6
7
8
9
class Program
{
    static void Main(string[] args)
    {
        var strCatName = "BlackCat";
        ICat cat = CatFactory.CreateCat(strCatName);
        cat.Meow();
    }
}
在这里,工厂的概念就产生了,可以看到,我们无论在哪里需要根据字符串获取到具体的小猫类时,都可以使用这个静态的工厂类,(注意,这里实现的只是一个简单的工厂类,不是完整的工厂模式,不过可以从中体会到工厂模式的思想)
体会从最开始的模式到工厂模式的变化
对于调用者来说,最开始的模式中,为了得到一个具体的小猫类,我们要需要自己描述小猫的外观,自己定义产生小猫的方法,最后才得到一个心仪的小猫类。而到了工厂模式,对于调用者来说,则只需要描述小猫的外观,由工厂那边代为处理,最后就能得到自己想要的结果,获取小猫的具体过程,不需要自己操心。
在前后两种模式的变化中,可以看到我们获取小猫的过程的控制权已经发生了转移,可以理解为交给了一个专业的工厂去处理这个过程,即使我们仍然需要通过调用工厂类,来达到我们的目的,但是这样做,已经让代码耦合性降低了,至于工厂类的出现让代码的职责划分得更加明确,加强了通用性就更加不必说了。
如何达到真正的控制反转呢
来看一段项目中使用了依赖注入中的构造函数注入的代码:
1
2
3
4
5
6
7
8
9
10
11
12
13
14
15
16
17
private readonly SqlSugarClient _db;

public BaseRepository(IUnitOfWork unitOfWork)
{
    _db = unitOfWork.GetDbClient();
}

/// <summary>
/// 写入实体数据
/// </summary>
/// <param name="model">实体类</param>
/// <returns></returns>
public async Task<int> Add(TEntity model)
{
    var insert = _db.Insertable(model);
    return await insert.ExecuteReturnIdentityAsync();
}
在使用这个BaseRepository类的时候,我们不需要手动去初始化unitOfWork,而是在代码走到其构造函数之前,已经得到了unitOfWork,进而得到_db来与数据库交互
是不是非常不可思议,就好像是小说里面的人物,心里想着一把兵器,兵器就自己出现在他手上。在类的内部函数中,没有任何一个对于要使用的类的实例化过程,兵器不是自己造的,也不是在要用到的时候委托别人去造的,更像是有人知道他需要这把兵器,就直接把这把兵器给他了。兵器的存在早于使用者自身的存在,这才是真正的,达到了控制反转
DI(依赖注入)
通过上文我们也知道了,依赖注入是实现控制反转的一种方式,上文也展示了其使用的效果,但是描述得非常玄幻,那么实际上,依赖注入是怎么实现的呢
其实,在介绍控制反转时开头引用的那段概念,已经可以很好的说明依赖注入的实现方式了,即: 通过控制反转,对象在被创建的时候,由一个调控系统内所有对象的外界实体,将其所依赖的对象的引用传递(注入)给它。
在我们.NET Core Web框架中,是如何实现这一点的呢,这里我们介绍.NET Core中两种依赖注入的方式
- 通过调用原生框架自带的依赖注入方法
上面提到了,依赖注入是由一个调控系统内所有对象的外界实体来完成的,这个实体在.NET Core框架中以容器的形式被提供,首先,查看Program.cs中的CreateHostBuilder函数
1
2
3
4
5
6
public static IHostBuilder CreateHostBuilder(string[] args) =>
    Host.CreateDefaultBuilder(args)
        .ConfigureWebHostDefaults(webBuilder =>
        {
            webBuilder.UseStartup<Startup>();
        });
这里调用了UseStartup,然后我们看到Startup.cs中的ConfigureServices函数,这个函数的官方介绍是This method gets called by the runtime. Use this method to add services to the container.,可以看出,这个方法是在运行时被调用,用来往容器中添加服务
没错,这里提到的容器,就是用来实现我们依赖注入的容器,这里要做的,就是在构建这个容器的时候,往里面添加我们需要用到的被注入的类就行了,我们直接用代码来说明,这里借鉴了Stack Overflow上一个答案的写法
为了更好的展示,这里新建一个API项目,然后新建一个接口ICounter,随后定义几个接口,继承ICounter
1
2
3
4
5
6
7
8
9
10
11
12
13
14
15
16
17
18
19
namespace WebLab.Interfaces
{
    public interface ICounter
    {
        public int GetCount { get; }
    }

    public interface ICounterTransient : ICounter
    {
    }

    public interface ICounterScoped : ICounter
    {
    }

    public interface ICounterSingleton : ICounter
    {
    }
}
接着,定义一个Counter类,实现这几个接口
1
2
3
4
5
6
7
8
9
10
11
12
13
14
15
16
using WebLab.Interfaces;

namespace WebLab.Classes
{
    public class Counter : ICounterTransient, ICounterScoped, ICounterSingleton
    {
        int _intCount;

        public Counter()
        {
            _intCount = 0;
        }

        public int GetCount => _intCount++;
    }
}
打开Startup.cs文件,编辑ConfigureServices函数的内容,编辑过后的代码是这样的:
1
2
3
4
5
6
7
8
public void ConfigureServices(IServiceCollection services)
{
    services.AddTransient<ICounterTransient, Counter>();
    services.AddScoped<ICounterScoped, Counter>();
    services.AddSingleton<ICounterSingleton, Counter>();

    services.AddControllers();
}
新建一个CounterService类,在这里注入我们在ConfigureServices中添加的接口,这里注入的对象都用public来修饰,确保之后可以在外部访问到
1
2
3
4
5
6
7
8
9
10
11
12
13
14
15
16
17
18
using WebLab.Interfaces;

namespace WebLab.Services
{
    public class CounterService
    {
        public CounterService(ICounterTransient counterTransient, ICounterScoped counterScoped, ICounterSingleton counterSingleton)
        {
            CounterTransient = counterTransient;
            CounterScoped = counterScoped;
            CounterSingleton = counterSingleton;
        }

        public ICounterTransient CounterTransient { get; }
        public ICounterScoped CounterScoped { get; }
        public ICounterSingleton CounterSingleton { get; }
    }
}
然后,将这个类也添加到ConfigureServices
1
services.AddTransient<CounterService>();
最后,定义我们的CounterController类,用于待会儿访问接口,查看结果
1
2
3
4
5
6
7
8
9
10
11
12
13
14
15
16
17
18
19
20
21
22
23
24
25
26
27
28
29
30
31
32
33
34
35
36
37
38
39
40
41
42
43
using Microsoft.AspNetCore.Mvc;
using System;
using WebLab.Interfaces;
using WebLab.Services;

namespace WebLab.Controllers
{
    [ApiController]
    [Route("[controller]")]
    public class CounterController : ControllerBase
    {
        private readonly ICounterTransient _counterTransient;
        private readonly ICounterScoped _counterScoped;
        private readonly ICounterSingleton _counterSingleton;
        private readonly CounterService _counterService;

        public CounterController(ICounterTransient counterTransient, ICounterScoped counterScoped, ICounterSingleton counterSingleton, CounterService counterService)
        {
            _counterTransient = counterTransient;
            _counterScoped = counterScoped;
            _counterSingleton = counterSingleton;
            _counterService = counterService;
        }

        [HttpGet]
        public string Get()
        {
            string strResult = "";
            string strNewLine = Environment.NewLine;

            strResult += $"Transient:{_counterTransient.GetCount}{strNewLine}";
            strResult += $"Scoped:{_counterScoped.GetCount}{strNewLine}";
            strResult += $"Singleton:{_counterSingleton.GetCount}{strNewLine}";

            strResult += $"Transient:{_counterService.CounterTransient.GetCount}{strNewLine}";
            strResult += $"Scoped:{_counterService.CounterScoped.GetCount}{strNewLine}";
            strResult += $"Singleton:{_counterService.CounterSingleton.GetCount}{strNewLine}";

            return strResult;
        }

    }
}
运行项目,通过请求http://localhost:5000/counter来查看返回的结果
第一次请求:
1
2
3
4
5
6
Transient:0
Scoped:0
Singleton:0
Transient:0
Scoped:1
Singleton:1
第二次请求:
1
2
3
4
5
6
Transient:0
Scoped:0
Singleton:2
Transient:0
Scoped:1
Singleton:3
现在我们了解了如何使用原生框架的依赖注入,可以看到使用构造函数注入过后,只需要直接在调用者的构造函数里面加上需要的被注入的类就行了,是不是非常方便呢
同时,也让我们体会了关于依赖注入另一个非常重要的内容,生命周期,通过观察上面的结果,可以总结出注入的生命周期分三种:
| 注入类型 | 生命周期 |
|---|---|
| Transient | 每个请求者得到的实例都是不一样的,每次涉及到注入的时候都会提供一个全新的实例 |
| Scoped | 在单次http请求中,得到的实例是一样的,在发起新的请求时,才会又提供新的实例 |
| Singleton | 在整个程序运行的生命周期内,得到的实例都是同一个 |
- 使用Autofac实现依赖注入
为了体现Autofac的优势,我们先调整项目结构
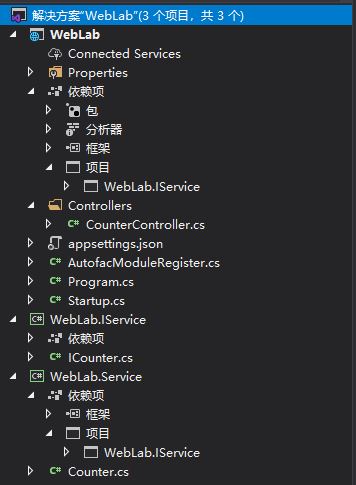
创建了一个IService层,来容纳之前的ICounter接口,再创建一个Service层,容纳具体类Counter,另外,去掉了刚刚为了演示生命周期创建的CounterService类,现在的CounterController类的内容为
1
2
3
4
5
6
7
8
9
10
11
12
13
14
15
16
17
18
19
20
21
22
23
24
25
26
27
28
29
30
31
32
33
34
35
36
using Microsoft.AspNetCore.Mvc;
using System;
using WebLab.Interfaces;

namespace WebLab.Controllers
{
    [ApiController]
    [Route("[controller]")]
    public class CounterController : ControllerBase
    {
        private readonly ICounterTransient _counterTransient;
        private readonly ICounterScoped _counterScoped;
        private readonly ICounterSingleton _counterSingleton;

        public CounterController(ICounterTransient counterTransient, ICounterScoped counterScoped, ICounterSingleton counterSingleton)
        {
            _counterTransient = counterTransient;
            _counterScoped = counterScoped;
            _counterSingleton = counterSingleton;
        }

        [HttpGet]
        public string Get()
        {
            string strResult = "";
            string strNewLine = Environment.NewLine;

            strResult += $"Transient:{_counterTransient.GetCount}{strNewLine}";
            strResult += $"Scoped:{_counterScoped.GetCount}{strNewLine}";
            strResult += $"Singleton:{_counterSingleton.GetCount}{strNewLine}";

            return strResult;
        }

    }
}
此时,怎么进行依赖注入呢,首先,在WebLab项目中引入包Autofac.Extensions.DependencyInjection,这个是Autofac用于依赖注入的包,之后,修改Program.cs文件的CreateHostBuilder函数
1
2
3
4
5
6
7
public static IHostBuilder CreateHostBuilder(string[] args) =>
    Host.CreateDefaultBuilder(args)
        .UseServiceProviderFactory(new AutofacServiceProviderFactory())
        .ConfigureWebHostDefaults(webBuilder =>
        {
            webBuilder.UseStartup<Startup>();
        });
可以看到,这里增加了一句.UseServiceProviderFactory(new AutofacServiceProviderFactory()),这代表我们会用Autofac来注入一些服务,此时切换到Startup.cs文件,增加函数
1
2
3
4
public void ConfigureContainer(ContainerBuilder builder)
{
    builder.RegisterModule(new AutofacModuleRegister());
}
AutofacModuleRegister.cs文件的内容:
1
2
3
4
5
6
7
8
9
10
11
12
13
14
15
16
17
18
19
20
21
22
23
using Autofac;
using System;
using System.IO;
using System.Reflection;

namespace WebLab
{
    public class AutofacModuleRegister : Autofac.Module
    {
        protected override void Load(ContainerBuilder builder)
        {
            var basePath = AppContext.BaseDirectory;
            var servicesDllFile = Path.Combine(basePath, "WebLab.Service.dll");

            // 获取 WebLab.Service.dll 程序集服务,并注册
            var assemblysServices = Assembly.LoadFrom(servicesDllFile);

            builder.RegisterAssemblyTypes(assemblysServices)
                      .AsImplementedInterfaces()
                      .InstancePerDependency();
        }
    }
}
到目前为止,通过Autofac进行依赖注入的过程就完成了,可以看到Autofac通过反射获取到程序集,再进行批量注入,这里是直接注入了WebLab.Service.dll,并通过使用方法AsImplementedInterfaces(),将程序集中的类型作为对应接口的具体实现类注入了程序集中所有类型的公共接口(IDisposable除外),所以之后在程序的任何地方,都可以直接使用被注入的接口
注意这里的InstancePerDependency是对标原生注入方法中的AddTransient,另外还能选择InstancePerLifetimeScope和SingleInstance,分别对应原生注入中的AddScoped和AddSingleton
最后我们运行程序,却发现在注册服务的时候出现了错误提示,这是为什么呢
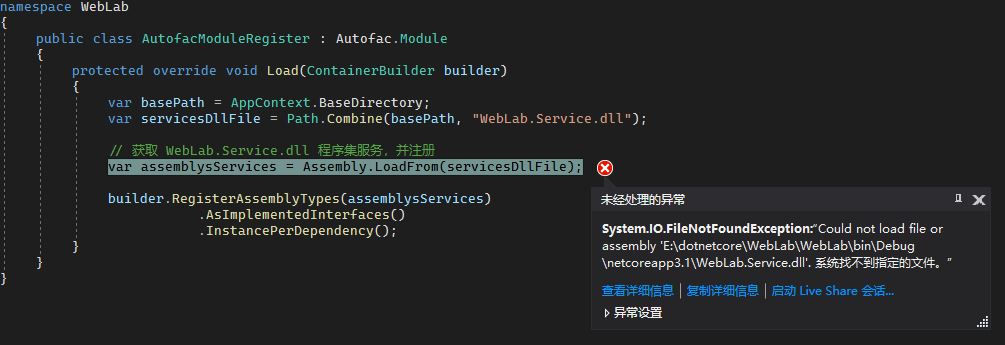
观察项目结构不难发现,我们现在的WebLab项目在Controller内已经是完全在调用接口了,和WebLab.Service项目已经完全解耦了,所以在作为启动项启动时,不会将WebLab.Service编译到程序启动目录,所以这里就不能正常注入了,于是我们调整WebLab.Service项目的生成路径,在项目属性-生成-输出-输出路径中将其生成路径调整到WebLab生成路径,这里使用相对路径

再次生成解决方案,运行项目,项目正确启动了,对接口进行请求,因为这里采用的是Transient注入,所以每次都会请求到相同的内容,可以感受到,当项目结构清晰,相似功能的接口较多的时候,利用Autofac进行批量依赖注入是非常方便的,使用很短的代码就可以实现需求
总结
依赖注入和工厂模式,都有效的解决了项目耦合度高,业务代码被入侵的问题。依赖注入,可以说通过容器这个“第三方”完成了以前工厂模式做的事情,并且更进一步的,让获取新实例的代码从实际业务代码函数中不可见,使代码层次更加清晰,真正达到了控制反转的目的。同时,其还能让我们更方便管理实例的生命周期
PS:文中用到的注入都是根据具体的实现类,对接口进行注入,达到了面向接口编程的目的,依赖注入的方法不局限于这样,也可以直接对具体的类或者对象实例进行注入,写法和用法相对容易理解,就不举例说明了