Vector使用备忘
Vector是高性能的可观测性数据管道(Observability Pipelines,关于什么是可观测性数据管道可以查看官方文档),用来收集,转换和路由日志和指标数据。
一、为什么使用Vector
高性能,低资源消耗,有一些相关的测评文章:
[Who is the winner — Comparing Vector, Fluent Bit, Fluentd performance by Ajay Gupta IBM Cloud Medium](https://medium.com/ibm-cloud/log-collectors-performance-benchmarking-8c5218a08fea) - 构建高性能可观测性数据流水线:使用Vector实现实时日志分析 - 知乎 (zhihu.com)
官方文档的Tuning(调优)页面这样说:
Vector is written in Rust and therefore doesn’t include a runtime or a virtual machine. There are no special service-level steps you need to undertake to improve performance as Vector takes full advantage of all system resources by default and without any adjustments.
翻译过来就是:
Vector 是用 Rust 编写的,因此不包含运行时或虚拟机。 您无需执行任何特殊的服务级别步骤即可提高性能,因为 Vector 默认情况下会充分利用所有系统资源,且无需任何调整。
| 除了性能之外,Vector还具有一些高级特性,比如:自适应并发请求([Adaptive request concurrency (ARC) | Vector documentation](https://vector.dev/docs/about/under-the-hood/networking/arc/)。请求下游服务时,根据响应速率自适应调节自身的并发速率)。 |
二、部署
参考文档:Install Vector on Docker | Vector documentation
2.1 拉取镜像
这里记录的是实际操作时使用的镜像信息,Vector的镜像每天都会自动构建
nightly镜像并且上传到Docker Hub,这里我们使用已经Release的版本。
1
docker pull timberio/vector:0.39.0-alpine
2.2 部署到k8s
最终部署时使用的完整YAML内容是:
1
2
3
4
5
6
7
8
9
10
11
12
13
14
15
16
17
18
19
20
21
22
23
24
25
26
27
28
29
30
31
32
33
34
35
36
37
38
39
40
41
42
43
44
45
46
47
48
49
50
51
52
53
54
55
56
57
58
59
60
61
62
63
64
65
66
67
68
69
70
71
72
73
74
75
76
77
78
79
80
81
82
83
84
85
86
87
88
89
90
91
92
93
94
95
96
97
98
99
100
101
102
103
104
105
106
107
108
apiVersion: apps/v1
kind: DaemonSet
metadata:
  labels:
    app: vector
  name: vector
  namespace: ops
spec:
  selector:
    matchLabels:
      app: vector
  template:
    metadata:
      labels:
        app: vector
    spec:
      containers:
      - env:
        - name: VECTOR_SELF_NODE_NAME
          valueFrom:
            fieldRef:
              apiVersion: v1
              fieldPath: spec.nodeName
        image: timberio/vector:0.39.0-alpine
        imagePullPolicy: IfNotPresent
        name: vector
        ports:
        - containerPort: 8686
          name: 8686tcp02
          protocol: TCP
        volumeMounts:
        - mountPath: /var/log/pods
          name: podlogdir
        - mountPath: /opt/docker-data/docker/containers
          name: dockerlogdir
        - mountPath: /opt/data/appdata/vector/data
          name: vectordata
        - mountPath: /root/.kube/config
          name: config
          subPath: config
        - mountPath: /etc/vector/vector.yaml
          name: vector
          subPath: vector.yaml
      imagePullSecrets:
      - name: redistry-key
      restartPolicy: Always
      volumes:
      - hostPath:
          path: /var/log/pods
          type: ""
        name: podlogdir
      - hostPath:
          path: /opt/docker-data/docker/containers
          type: ""
        name: dockerlogdir
      - hostPath:
          path: /opt/data/appdata/vector/data
          type: ""
        name: vectordata
      - configMap:
          defaultMode: 292
          items:
          - key: config
            path: config
          name: kubernetes
          optional: false
        name: config
      - configMap:
          defaultMode: 292
          items:
          - key: vector.yaml
            path: vector.yaml
          name: vector
          optional: false
        name: vector
---
apiVersion: v1
kind: Service
metadata:
  name: vector
  namespace: ops
spec:
  ports:
    - name: 8686tcp02
      port: 8686
      protocol: TCP
      targetPort: 8686
  selector:
    app: vector
  sessionAffinity: None
  type: ClusterIP
---
apiVersion: v1
kind: Service
metadata:
  name: vector-lb
  namespace: ops
spec:
  externalTrafficPolicy: Cluster
  ports:
    - name: 8686tcp02
      port: 8686
      protocol: TCP
      targetPort: 8686
  selector:
    app: vector
  sessionAffinity: None
  type: LoadBalancer
三、配置
Vector有三个重要概念,分别是Sources(数据从哪来),Transforms(对日志进行何种转换),以及Sinks(将数据写到哪里去)。对于这三种概念,都有非常丰富的配置可供选择。
Vector的配置文件默认放置于/etc/vector/vector.yaml,我们先进行一些初始化配置(配置中还能使用环境变量,并且支持多配置文件):
1
2
3
4
5
6
7
8
# 默认文件存储目录,Vector需要一些磁盘空间来持久化当前运行状态
# 例如用来当作磁盘缓冲区,或者保存checkpoints
data_dir: "/opt/data/appdata/vector/data"

# Vector HTTP API配置(默认不启用)
api:
  enabled: true
  address: "0.0.0.0:8686"
3.1 Sources
| 首先配置日志的Sources,也就是日志来源,当前我们想采集Kubernetes logs,参考文档:[Kubernetes logs | Vector documentation](https://vector.dev/docs/reference/configuration/sources/kubernetes_logs/)。 |
1
2
3
4
sources:
  k8s:
    type: kubernetes_logs
    kube_config_file: /root/.kube/config
3.2 Transforms
日志的转换是关键步骤,如果直接完整记录k8s中采集到的日志,那么结构就像这样: 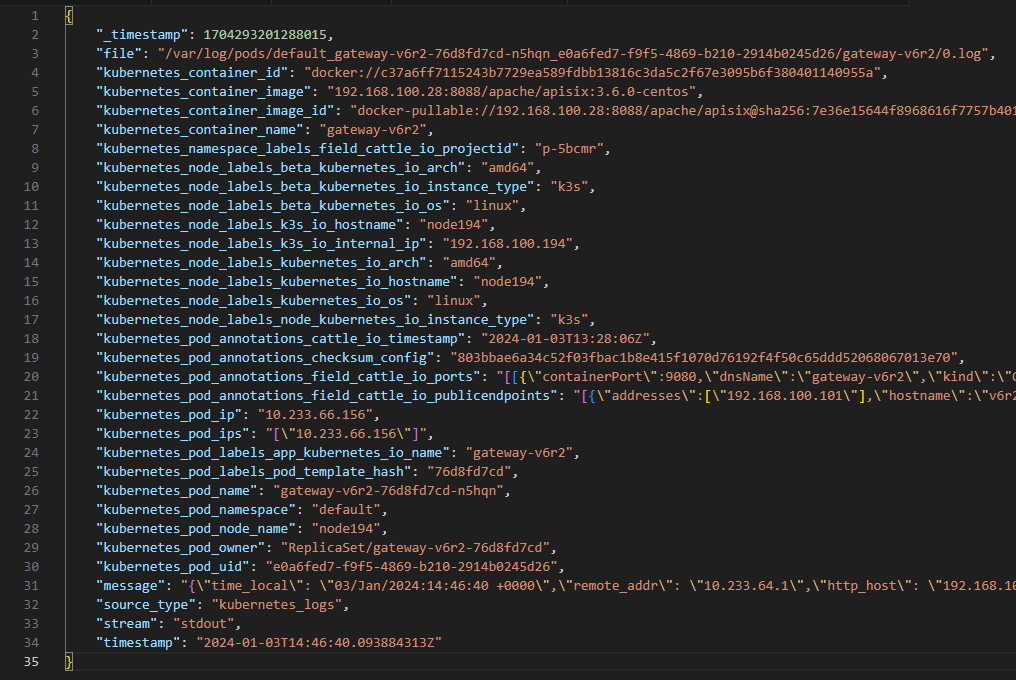
内容多固然是好事,可惜有很多内容是我们不需要的,并且其结构不太符合我们的预期,因此我们希望能够借助某种能力将其进行转换,这时候就要用到Transforms。
Vector支持多种Transform方式,我们选用Remap with VRL的方式,因为这种方式不仅和Filter一样可以用来过滤数据,并且在数据转换上的性能比Lua更好(官方文档上描述的是使用Lua进行数据转换大约会比VRL慢百分之60)。
3.2.1 编写脚本转换apisix网关的日志
apisix作为开源网关工具,它的日志详细格式我们无法自定义,在这里,我们希望将其日志转换成如下格式:
将部分k8s日志本身的内容提取成字段,以
k8s_作为前缀,解析message字段中的内容,以app_log_作为前缀,并进行部分数值转换
编写VRL表达式时,官方有许多资料可供参考(包括函数,异常,简单示例等)。并且官方还提供了VRL playground,可以直接将当前数据粘贴上去,一边编写程序一边调试。这里直接粘贴编写好的脚本:
1
2
3
4
5
6
7
8
9
10
11
12
13
14
15
16
17
18
19
20
21
22
23
24
25
26
27
28
29
30
31
32
33
34
. = flatten(., "_")
if (.kubernetes_container_name == "gateway" && starts_with(string!(.message), "{")) {
    msg_data = .message
    . = {
        "k8s_service_name": .kubernetes_container_name,
        "k8s_pod_name": .kubernetes_pod_name,
        "k8s_namespace": .kubernetes_pod_namespace
    }
    data = parse_json!(msg_data)
    if (is_null(data.request_time) || is_null(data.upstream_response_time)) {
        abort
    }
    data.request_time = string!(data.request_time)
    data.upstream_response_time = string!(data.upstream_response_time)
    if (is_empty(data.request_time) || is_empty(data.upstream_response_time)) {
        abort
    }
    request_time = parse_float!(data.request_time) * 1000
    upstream_response_time = parse_float!(data.upstream_response_time) * 1000
    .app_log_time_local = data.time_local
    .app_log_remote_addr = data.remote_addr
    .app_log_http_host = data.http_host
    .app_log_request = data.request
    .app_log_status = parse_int!(data.status)
    .app_log_body_bytes_sent = parse_int!(data.body_bytes_sent)
    .app_log_request_time = request_time
    .app_log_http_referer = data.http_referer
    .app_log_http_user_agent = data.http_user_agent
    .app_log_upstream_addr = data.upstream_addr
    .app_log_upstream_status = parse_int!(data.upstream_status)
    .app_log_upstream_response_time = upstream_response_time
} else {
  abort
}
3.2.2 配置Transforms
这里需要指定transform的inputs,并且将type指定为remap,另外我们还希望abort操作丢弃数据,因此最后的配置为:
1
2
3
4
5
6
7
8
9
10
11
12
13
14
15
16
17
18
19
20
21
22
23
24
25
26
27
28
29
30
31
32
33
34
35
36
37
38
39
40
41
transforms:
  apisix_transform:
    type: remap
    inputs:
      - k8s
    drop_on_abort: true
    source: |-
      . = flatten(., "_")
      if (.kubernetes_container_name == "gateway" && starts_with(string!(.message), "{")) {
          msg_data = .message
          . = {
              "k8s_service_name": .kubernetes_container_name,
              "k8s_pod_name": .kubernetes_pod_name,
              "k8s_namespace": .kubernetes_pod_namespace
          }
          data = parse_json!(msg_data)
          if (is_null(data.request_time) || is_null(data.upstream_response_time)) {
              abort
          }
          data.request_time = string!(data.request_time)
          data.upstream_response_time = string!(data.upstream_response_time)
          if (is_empty(data.request_time) || is_empty(data.upstream_response_time)) {
              abort
          }
          request_time = parse_float!(data.request_time) * 1000
          upstream_response_time = parse_float!(data.upstream_response_time) * 1000
          .app_log_time_local = data.time_local
          .app_log_remote_addr = data.remote_addr
          .app_log_http_host = data.http_host
          .app_log_request = data.request
          .app_log_status = parse_int!(data.status)
          .app_log_body_bytes_sent = parse_int!(data.body_bytes_sent)
          .app_log_request_time = request_time
          .app_log_http_referer = data.http_referer
          .app_log_http_user_agent = data.http_user_agent
          .app_log_upstream_addr = data.upstream_addr
          .app_log_upstream_status = parse_int!(data.upstream_status)
          .app_log_upstream_response_time = upstream_response_time
      } else {
        abort
      }
3.3 Sinks
当前需要将日志记录到OpenObserve,其提供了HTTP方式的API,HTTP Sink的文档参考:HTTP | Vector documentation。这里参考了OpenObserve提供的配置示例:Vector - OpenObserve Documentation
1
2
3
4
5
6
7
8
9
10
11
12
13
14
15
16
17
18
19
20
21
22
23
24
25
26
27
28
29
sinks:
  openobserve:
    type: http
    inputs:
      - k8s # 使用上面配置的k8s日志source作为输入
    uri: http://openobserve:5080/api/k8s/pods/_json
    method: post
    auth:
      strategy: basic
      user: root@example.com
      password: Complexpass#123
    compression: gzip
    encoding:
      codec: json
      timestamp_format: "rfc3339"
  apisix_openobserve:
    type: http
    inputs:
      - apisix_transform # 使用上面配置的transform作为输入
    uri: http://openobserve:5080/api/services/gateway/_json
    method: post
    auth:
      strategy: basic
      user: root@example.com
      password: Complexpass#123
    compression: gzip
    encoding:
      codec: json
      timestamp_format: "rfc3339"